What to Expect From an Inspection
Buying a home is one of the most significant financial decisions you'll ever make. That's why, as your REALTOR®, I always tell my clients the same thing: never skip the home inspection. Whether you're purchasing a charming Mueller townhome, a mid-century East Austin bungalow, or a newer build anywhere in the Austin metro, a professional home inspection is your single best tool for understanding exactly what you're buying before you sign on the dotted line.
If you're new to the homebuying process, the inspection phase can feel a little intimidating. What does the inspector actually look for? How long does it take? And what do you do when the report comes back with a long list of items? Let me walk you through every step so you feel confident and prepared.
A home inspection isn't just a formality. It's your opportunity to know what you're buying - and to negotiate from a position of clarity.
Step 1: Scheduling the Inspection
Once your offer has been accepted and you're under contract, the clock starts ticking. In Texas, the inspection period - sometimes called the option period - is typically negotiated as part of the contract and usually runs between 5 and 10 days. During this time, you have the unrestricted right to terminate the contract for any reason.
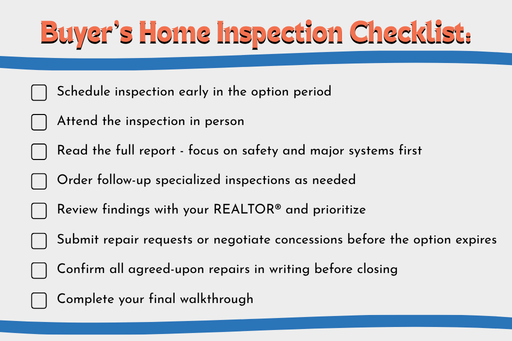
I always advise my clients to schedule their inspection as early as possible during the option period. This gives you enough time to review the report, request any follow-up specialized inspections, and negotiate with the seller if needed - without running out of the clock.
When choosing an inspector, look for someone who is licensed by the Texas Real Estate Commission (TREC), carries errors and omissions (E&O) insurance, and has strong local reviews. I have a list of trusted inspectors I refer to my clients regularly, and I'm happy to share them.
Step 2: What the Inspector Examines
A licensed Texas home inspector follows the TREC Standards of Practice, which defines what must be inspected and reported. A thorough inspection will cover the following major systems and components:
Structural Components
The inspector examines the visible foundation, framing, floors, walls, and roof structure. In Austin, where expansive clay soils are common, foundation checks are especially important.
Foundation - visible cracks, settling, or movement
Framing and load-bearing walls
Floors, ceilings, and interior walls for signs of stress or damage
Roofing System
The inspector will assess the roof covering, gutters, downspouts, and any penetrations (vents, chimneys, skylights). They typically walk the roof when safely accessible or use binoculars and drones when it isn't.
Condition and remaining lifespan of roofing materials
Flashing, soffits, fascia, and eaves
Gutters and drainage
Electrical Systems
The inspector checks the main electrical panel, wiring, outlets, switches, and GFCI (ground fault circuit interrupter) protection. Older Austin homes sometimes still have outdated wiring configurations that are worth flagging.
Service panel and breakers
Grounding and GFCI protection near water sources
Visible wiring condition throughout the home
Plumbing Systems
Plumbing inspections cover supply lines, drain lines, water heater, fixtures, water pressure, and visible pipes. I usually recommend a separate sewer scope (a camera inspection of the underground drain line) for most homes, including new construction.
Water heater condition, age, and code compliance
Sink, toilet, shower, and tub function
Visible supply and drain lines
Water pressure and drainage speed
HVAC Systems
Heating, ventilation, and air conditioning are big-ticket items - and in Texas, your AC is practically a life-support system. The inspector tests the system, checks the filter and ductwork, and notes any apparent age or serviceability concerns.
Heating and cooling function and airflow
Condition of the air handler and condenser unit
Ductwork, vents, and registers
Thermostat operation
Insulation and Ventilation
• Attic insulation depth and type
• Attic and crawl space ventilation
• Vapor barriers where applicable
Doors, Windows, and Interior
• Door and window operation and seals
• Signs of water intrusion around windows and exterior walls
• Visible signs of moisture, mold, or pest damage inside the home
Exterior and Grading
• Exterior cladding, siding, and trim condition
• Driveways, walkways, and decks
• Grading and drainage - does the yard slope away from the foundation?
• Fencing, outbuildings, and visible detached structures
Built-In Appliances
If the seller is leaving appliances - dishwasher, range, built-in microwave - the inspector typically tests their basic operation.
Your inspector's job isn't to scare you away from the house. It's to give you a clear, honest picture of its condition so you can make an informed decision.
Step 3: Should You Attend the Inspection?
Absolutely yes - and I always encourage my clients to be there at the end for a walkthrough of the findings - don’t come for the whole inspection - you’ll just be in the way. An inspection usually takes about two to four hours, depending on the size and age of the home. Walking through the inspection with your inspector is one of the most valuable parts of the entire homebuying experience.
You'll see firsthand what the issues look like, understand their severity, ask questions on the spot, and leave with a much deeper understanding of the home you're buying. Even if the report is 50 pages long, being present makes it far less overwhelming.
Sellers are typically not present during the buyer's inspection. That time is for you.
Step 4: Understanding the Inspection Report
After the inspection, you'll receive a detailed written report - usually within 24 hours. This is a comprehensive document with photos, descriptions, and recommendations for every item the inspector flagged. A typical report ranges from 30 to 80+ pages.
Don't panic at the page count. Here's how I coach my clients to read it:
Safety hazards - Anything that poses an immediate risk: missing GFCI outlets, faulty electrical panels, gas leaks, carbon monoxide concerns. These are items to be addressed.
Major systems - Roof, HVAC, foundation, plumbing, and electrical. These are the expensive items. If they're flagged, we need to understand cost and severity.
Deferred maintenance - Smaller items that haven't been addressed: dripping faucets, worn caulking, missing weather stripping. Important, but usually not dealbreakers and a good introduction to being a homeowner.
Informational notes - Items that are older or at the end of their typical lifespan. Not failures yet, but worth budgeting for and keeping an eye on.
Remember: no home is perfect. Every home - new construction included - will have items in the inspection report. The question isn't whether items exist; it's whether they're manageable and manageable for YOU.
Step 5: Specialized and Follow-Up Inspections
The general home inspection is just the foundation. Depending on what the inspector finds - or what the property warrants - you may want to order additional specialized inspections. Common ones in the Austin market include:
Sewer scope - A camera is run through the underground drain lines to check for root intrusion, cracks, or blockages. I recommend this for most homes, especially those over 20 years old.
Foundation evaluation - If the home inspector flags any foundation concerns, a licensed structural engineer provides a more detailed assessment and a repair estimate if needed.
Mold testing - If the inspector sees evidence of moisture or mold, a certified mold assessor can test the air quality and identify the scope of the issue.
Pest / WDI inspection - A wood-destroying insect inspection checks for termites, carpenter ants, and other pest damage. In Central Texas, this is often recommended for homes over 5 years old.
Pool / spa inspection - If the property has a pool, a dedicated pool inspector evaluates the equipment, structure, and safety.
Chimney inspection - If the home has a fireplace, a chimney sweep can assess its condition and safety.
Step 6: Reviewing Results With Your REALTOR®
Once you have the full report and any follow-up inspections, we sit down together and triage the findings. This is where having an experienced local agent really matters.
I help my clients distinguish between items worth negotiating, items to budget for and accept, and - in rare cases - items significant enough to walk away from. Every situation is different, and context matters enormously. A flagged item in a home priced to reflect its condition is very different from the same item in a home priced at a premium.

Step 7: Negotiating Repairs and Concessions
During the option period, you have the right to request that the seller make repairs, provide a credit, or reduce the price - or you can simply terminate the contract. This is a negotiation, and there's genuine strategy involved.
Common approaches in today's Austin market include:
Repair requests - Asking the seller to fix specific items prior to closing. I recommend keeping these focused on safety issues and major systems.
Seller credit - Instead of asking the seller to do the work (which can be unpredictable in quality), you request a dollar credit at closing and handle the repairs yourself. This is often the cleaner approach.
Price reduction - In some cases, a price adjustment rather than a credit is the more practical solution, especially if the repair cost is significant.
Sellers are not obligated to agree to any requests. They may accept, counter, or decline. If they decline and you can't reach an agreement, you can terminate within the option period and receive your earnest money back - but not your option fee, which was paid for the option to terminate. I help my clients navigate this carefully so emotions don't get in the way of good decisions.
For more on the negotiation side of selling, my blog What to Expect When Selling a Home in 2026 walks through how sellers approach these conversations from their side.
Step 8: After Negotiations - What Happens Next?
Once inspection negotiations are wrapped up - whether you received concessions, accepted the home as-is, or came to a middle-ground agreement - the transaction moves forward. Here's what comes next:
Appraisal - If you're financing the purchase, your lender will order an appraisal to confirm the home's value supports the loan amount.
Repairs verified - If the seller agreed to make repairs, you'll want written documentation and receipts. In some cases, a re-inspection of the specific repaired items is warranted.
Final walkthrough - Typically 24–48 hours before closing, you'll do a final walkthrough to confirm the home is in the agreed-upon condition and any negotiated repairs have been completed.
Closing day - You sign paperwork, the funds transfer, and you get your keys.